A how to guide to help you get started in the world of vlogging. (Credit: Flickr user Isaac)
Ensuring research outputs and findings have an impact in society is becoming an increasingly important part of successfully securing research funding. Perhaps even more importantly, some might argue that it is the responsibility of all geoscientists to communicate their science and research. Whatever your motivations for choosing to engage colleagues and non-scientific audiences with your research, finding the best way to do so can prove tricky.
Vlogging – video blogging – is an alternative to traditional blogging and film-making which is growing increasingly popular. What is vlogging and how do I know if it is right for me, you might ask? Today’s post, brought to you by Simon Clark, (otherwise known as @SimonOxfPhys), an atmospheric sciences PhD student at Exeter University and seasoned YouTube vlogger, is a crash course in how to get started in the world of vlogging.
If Simon’s post inspires you to take up vlogging, but you want to know more, then come along to the short course: The communicating geoscientist (SC44), at the General Assembly in Vienna. Simon is one of the speakers and it’s a great opportunity to learn more about vlogging and to put your questions to him too!
Over the course of my undergraduate degree and PhD I have made literally hundreds of videos across a variety of genres. I’ve come to specialise in making video blogs or vlogs about my life doing a PhD and the subject matter I deal with every day. Over the course of doing this I’ve picked up a variety of skills and techniques that I hope to share with you in this post.

Meet Simon, of SimonOxfPhys fame and author of this guide. (Credit: Simon Clark)
First of all understand something – making good quality videos is hard! And it can all seem overwhelming to first-time vloggers. The expertise in making videos ranges from lighting to sound recording, editing to writing, and networking to data management. And as we only tend to watch accomplished vloggers we only see people who have mastered some, or all, of these skills. Take heart in the fact that a general rule of thumb with video making is this:
Your first fifty videos will suck. They’ll start getting better after that.
That may sound depressing but don’t be disheartened! Even the great legends of the vlogging scene (see the end of the post for some examples) started out with terrible videos, and in many cases those videos are still live on YouTube. Just compare the first and most recently uploaded videos on a channel and you’ll see that almost everyone started at a very low level.
That makes persistence the greatest asset for any aspiring videomaker. Sheer stubbornness and a thick skin will get your videos looking slick in no time. (Well, some time…) Once you accept the fact that your first videos aren’t going to be the next Schindler’s List you remove a certain amount of anxiety, and will find that you have less of a problem getting that first video done. And once that video’s done, the next video becomes much easier, and so on. Don’t compare your beginning to somebody else’s middle.
A video consists of: content, video, audio, an edit, and a release, and the bulk of this post is going to look through this creative process, vaguely in order. Along the way I’ll share some kit recommendations, some suggested viewing, and some things NOT to do!
1. Find your niche
On the internet there is no such thing as too small a niche, and there are a huge number of video creators that specialise in very narrow fields. Decide early on what your creative focus is going to be, and stick to it. A clear mission statement – content, intended audience, intended purpose – will help you decide which videos to make . In my case when I started making vlog content I wanted to:
- have my personality present in the video, and make geeky references to music, film, and books
- talk about my PhD – both the process of studying and the subject matter
- talk about life outside of research such as my singing with the University of Exeter chapel choir
- appeal to undergraduates curious about PhD research, school students interested in university life, and anyone with similar interests to myself
- educate people about my field, inform them about the life of a PhD student, and do so in an entertaining way
While drawing inspiration from what others have done is to be encouraged, try to define what your unique selling point is. It might be your particular area of research, the location in which you work or…
2. Decide on your presentation style
… your presentation style. The same content can be covered in a huge number of ways. A video explaining a scientific concept can be delivered directly to camera with graphics appearing on-screen, or it could be explained just using your hand on a marker and whiteboard, or it could be explained entirely through animation. Which style you choose to use is entirely up to you, your technical skills, and how confident you feel in appearing on camera. If that’s a concern for you then just look at CGP Grey – an educational channel where the identity of the creator is never on-screen – and has in excess of two million subscribers and 200 million views. Part of the success of that channel is in Grey’s clear artistic choice and his sticking to it for several years.
While consistency has worked for CGP Grey, it may well be that based on feedback from your viewers you change how you make your videos over time. This is of course also fine! The two-way interaction between audience and creator on YouTube is one of the most satisfying parts of the platform, and can provide valuable information on how to improve your content.
3. Getting good sound
I want to make something very clear – good sound > good video.
A lot of people when starting out on YouTube focus on getting the best camera or lens possible, and invest a lot of money in kit that makes them look glamorous. This is the wrong way to go about things! People’s ears are much easier to offend than their eyes, and people will tolerate a video with good sound but shot on a potato far more easily than a video with crisp, beautiful visuals that was recorded via a tin can on a string. If your budget limits you to making a decision between investing in a camera or investing in a microphone, pick the microphone every time. This allows you to adhere to a golden rule of film making – whatever you do, try to avoid using in-built camera microphones}.
I have a few recommendations to make when it comes to microphones. Firstly there are two types that you will want to look into – lavalier or lapel microphones, and shotgun microphones.
Lavalier (lav for short) microphones are very small, allowing you to clip them to your lapel or shirt. This lets you to record very close to your mouth and so delivers a lovely sound if you’re recording vocals, for example speaking to camera.
Shotgun microphones are sadly less exciting than they sound, and simply resemble tubes. The benefit of this design is that they only pick up sound from the direction they are pointing, and so reject sound from other directions. This makes them more versatile than lav microphones, but less specialised to only recording vocals. They are also a bit more expensive.
If you do plan on recording vocals with a shotgun microphone, make sure that you get the microphone as close to you as possible, ideally less than 45 cm away from your mouth. That means not using the shoe mount on top of your camera and either booming it above you or having it on a stand below you just out of frame.
For most people I would recommend lav microphones as the easiest way to get good quality audio at low cost and minimal fuss if you’re not planning on doing anything other than speaking to camera in an otherwise quiet environment. If you plan on doing more than that, or if you don’t want to worry about wires to your lav microphone being in shot (or just getting tangled around you), then it might be worth investigating a shotgun microphone.
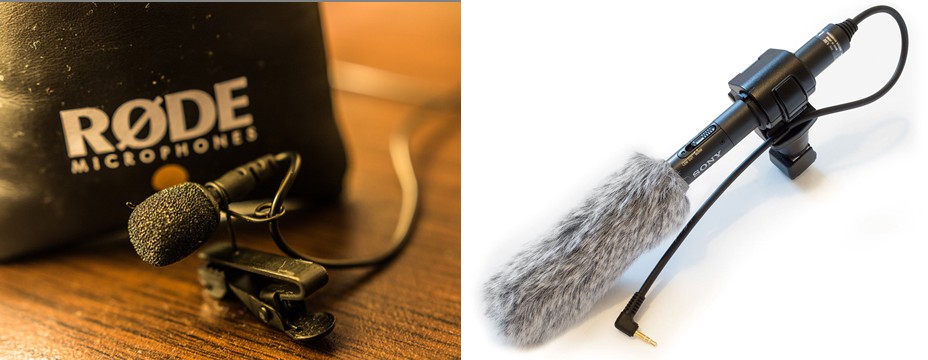
To start off with, consider using a lav microphone (l) or a shotgun microphone (r). Credit: Rode Lav Mic by Jim Makos, distributed via Flickr. Shotgun microphone by SkywalkerPL – Own work, CC BY 3.0, Wikimedia Commons
Lastly if your budget allows for it, consider using a portable recorder such as a Tascam DR-05 to plug your microphones into instead of going direct into your camera. This will allow for a higher quality recording, as cameras record at a higher impedance than most microphones which degrades the signal. Also portable recorders generally include a decent set of omni-directional microphones, which are useful if recording a whole room such as a meeting or a performance.
4. Recording your video
So I trashtalked video earlier. That’s not to say that good quality video isn’t important, just that it’s not quite as important as good quality audio.
Some guidelines to follow:
- aim for 720p video at minimum, ideally aim for 1080p (the p referring to the number of pixels tall the frame is)
- shoot at either 25 frames per second or 30 frames per second depending on where you live
- if you’re using a DSLR remember that the camera body is nowhere near as important as the lens you’re using
Most people when starting out will either use a webcam or a compact camera to record their video. These are both absolutely fine choices – I personally use the Canon G7X to record travel vlogs – but remember that if you’re stuck just using your webcam you can always use your phone! Most smartphones these days are capable of recording nicely at full HD, and when combined with audio from a good microphone can give a very professional look. If a film shot entirely on an iPhone can enter the competition at the Cannes film festival then it’s certainly good enough for you! Invest in a decent tripod or gorillapod if you’re using a compact or smartphone camera.

PhotoSEL, by Katie Chan (Own work), via Wikimedia Commons.
If you are looking to upgrade the look of your video then before investing in camera kit consider your lighting setup. A well-lit video is a good-looking video, and there are many great lighting tutorials on YouTube. I personally recommend using a pair of Photosel softboxes as an extremely versatile lighting setup for not too much money, though even a single light used in the right way can look fantastic.
If you do want to invest in your camera kit then the quality point above a compact camera or phone is the DSLR, which can range in price from a few hundred pounds to a few thousands, and have the advantage of being able to change lenses which makes them very versatile. This is a huge subject that really deserves an article all of its own but for a start I can recommend the Canon 600D.If you would like to upgrade your look then a very cheap way to do this is to get a 50mm f/1.8 lens which gives you a lovely shallow depth of field, and allows you to shoot in low light levels.
Remember though when looking to improve the quality of your production, the decreasing order of importance goes:
- sound
- lighting/framing
- lens
- camera body
5. Editing
So once you have your video and audio it’s time to chop them up into your finished video. This is often the step that puts off beginners but with a little learning it can actually be the most rewarding part of the process. For most first time film makers the difficulty comes in choosing their editing software. Professional licences cost hundreds of pounds but there are plenty of free or cheap alternatives.
For mac users iMovie is a surprisingly comprehensive editing program that will do almost anything that you will want to as a beginner, and was what I started using. Windows users are advised to stay away from Windows Movie Maker in all but the very simplest of editing tasks – as a program it just doesn’t have the necessary features. Free alternatives to these programs include Lightworks and the surprisingly complex DaVinci Resolve extensive free tutorials for which are available online. If you wanted to spend some money on editing software – which I wouldn’t advise unless you’re planning on doing something very complex – then I personally use Sony Vegas Platinum which gives a huge amount of control comparable to professional programs like Final Cut and Premiere.
Spend some time getting to know your editing software and take baby steps. Once you feel comfortable with basic tasks like trimming clips and matching audio to video then you will find videos almost make themselves. That may sound flippant but with practice you’ll find that while shooting you’re already editing in your head, with the steps of actually editing almost being a formality at the end of the project.
A few tips when editing:
- If recording your audio and video separately (such as on your phone or a portable recorder) clap at the start of each file you record. This allows you to easily synchronise your audio and your video, and you can pair the two together such that editing one edits the other (this is why Hollywood uses clapper-boards).
- Limit dead noise where you aren’t talking at the end of clips, and particularly at the start of the next clip in your sequence. Realistically you only need one to two frames (timing-dependent) of dead noise at the end of a clip, and none to one frame at the start of the next. Read the waveforms in your audio to do this.
- Look into brightness and contrast settings to give your footage some boost, or colour curves if you’re feeling ambitious. A slight increase in contrast can cover up speckly dark areas in poorly-lit video.
- Make sure your editing project has the same settings as your input data, in particular the same fps (frames per second). A mismatch of fps between input and output results in a very amateur video
Clapperboard, by KUHT via Wikimedia Commons.Edit in graphics and titles to emphasise points you’re making – you have nearly unlimited power at your fingertips, so use it!
- Be careful not to let your video run on longer than it should. Ask yourself if you’d be interested in watching the whole thing and trim it down if that’s not the case.
- A general good rule to follow: if in doubt, leave it out.
6. Spreading your message
Once you have your masterpiece it’s time to get it out there into the view of your target audience. I highly recommend uploading to YouTube as it’s simply the dominant video website today. Similar sites such as Vimeo have their own niches but YouTube will allow you to reach the largest audience. That’s not to say that you couldn’t also upload to other sites too, and in particular consider uploading natively to Facebook if you have a public Facebook page. Facebook pushes video in a big way, and so can be a great way to reach a young audience.
Generally speaking you should promote your video on whatever social media accounts you have – it may be worth setting up accounts specifically for outreach work, and where possible use hashtags such as #climatechange or #geologyrocks to help people find your video. Personally I use a public Facebook page, Twitter, Instagram and of course my YouTube channel to promote my videos.
A great way to increase your audience is also to collaborate with other creators you work in similar fields. For example, CGP Grey collaborated with another fantastic educational YouTuber, Brady Haran, to make a video on US vs UK numbering systems This boosted both of their creator profiles by moving subscribers from one channel to the other, and started a collaboration that has lasted for years since.
That’s another reason to collaborate with other creators – it’s a lot of fun!
And if you are attending the EGU General Assembly in Vienna, be sure to attend the Scientists must film short course (SC47) where an online & cross media specialist will be sharing tips on how to disseminate their film work effectively.
7. Rogue’s gallery
Here I present a few examples of great work in online film making. Give a few videos a watch and see if you can identify what each channel’s unique selling point or mission statement is.
- Starting the list on a low note, my own channel
- As referenced several times above, UK-based educator CGP Grey
- An interesting vlogging collaboration and one of YouTube’s longest-running communities, the vlogbrothers (also check out their affiliated channels)
- One of the vlogbrothers’ offshoot channels, SciShow is actually a collection of educational channels based in Montana:
- For an example of a more traditional vlogging channel, Jake Wright vlogged his daily life at Cambridge University and more recently in graduate employment
- Lastly for an example of informative content conveyed in a personal way, Thomas Frank’s channel about college study in the US, College Info Geek
I hope this post has been interesting, as it was certainly interesting for me to try and condense several years of experience into one post! If you have any further questions I am more than happy to answer them – on twitter I am @simonoxfphys.
By Simon Clark, atmospheric sciences PhD student at Exeter University and YouTube vlogger
If Simon’s post inspires you to take up vlogging, but you want to know more, then come along to the short course: The communicating geoscientist (SC44), at the General Assembly in Vienna. Simon is one of the speakers and it’s a great opportunity to learn more about vlogging and to put your questions to him too! The EGU General Assembly is taking place in Vienna, Austria from 17 to 22 April. Check out the full session programme on the General Assembly website.


Ashley Jones
Would like to say thank you so very much……I have ASUS40i/K50i series, 64 bit, windows 10 and webcam was showing upside down. Followed your instructions to the latter (installed windows 7 driver) and the problem of upside camera was fixed……….I am not young, don’t understand about computers, drivers etc, & after much reading/researching decided to follow your advice. Thank you again for helping me….rene.
Harold Burton
Hi! Nice review. Thank you! How do you put that filter to get rid of the green screen? Which software are you using to do so? I am using an iMac and I want to do that. Could you please help me with that?
Bloggin Brandi
I think people over think the recording part especially if you are vlogging or doing educational content. People are showing up to see what is going on or searching for something. They don’t always care what you have on. And, honestly I get the biggest response when I mess up in my videos and let it roll. This is a great guide to get started even giving me some new tips 🙂
Pingback: GeoLog | GeoTalk: Beatriz Gaite on why videos are a great tool for communicating your research to a broad audience